Automatic 12V Lead-Acid Battery Charger

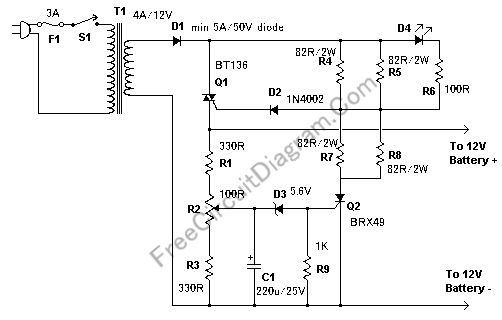
This charger circuit is suitable for lead-acid battery, including flooded, gel, and AGM types. The automatic term means that this charger will stop charging automatically when the battery voltage reach a certain pint, indicating that the battery has been fully charged, and charging will be restarted if the battery voltage falls below that threshold. A LED indicator is provided to show you when the battery is fully charged. This automatic battery charger can be left connected to a battery indefinitely to maintain full charge safely. Here is the circuit’s schematic diagram:
- R2 is used to adjust the final voltage when the charger should stop charging. For flooded and gel type, the batteries are usually charged to 13.8V. For cycling the battery (AGM or gel), 14.5V to 14.9V is usually recommended by battery manufacturers. Set the R2 pot to midpoint, turn on the charger and connect a battery to its output. Monitor the charge with a voltmeter until the battery reaches the proper end voltage, then adjust the pot until the LED glows constantly. To charge different types of batteries, you can mount the pot on the front of the case and mark each position of every battery types ending voltage.
- Install aproper heatsink for Q1. A small fan might be necessary and can generally be powered right off the output of D1 If the circuit is mounted in a case.
- Choose T1 transformer which is appropriate for your local line voltage (120V, 220V, etc.) with 12 Volt secondary output.
- If the circuit is powered off, you should disconnect the battery because the circuit will drain the battery slowly, and this could damage your battery if the battery is drained while it’s voltage falls below about 10V.
[Circuit’s schematic diagram source: aaroncake.net]