Electronic Metronome

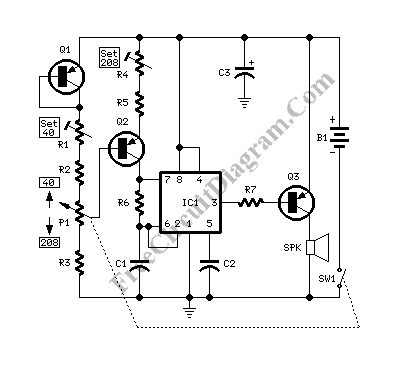
Metronome is very important tool if you studying music playing. There are mechanical metronome device in the past, but today, electronic metronome is much more popular since it can be very simple, compact/small, reliable, and also has the most interesting feature: cheap. Here is one example of the electronic metronome schematic:

Parts:
- C1 1 uF 63V Polyester Capacitor
- C2 10nF 63V Polyester Capacitor
- C3 47 uF 25V Electrolytic Capacitor
- R1 10K 1/2W Trimmer Cermet
- R2 10K 1/4W Resistor
- R3 330K 1/4W Resistor
- R4 50K 1/2W Trimmer Cermet
- R5 100K 1/4W Resistor
- R6,R7 1K 1/4W Resistor
- P1 100K Linear Potentiometer
- SW1 SPST Switch (Ganged with P1)
- SPK 8 Ohm 40mm. Loudspeaker
- B1 12V Battery (MN21, GP23A or VR22 type)
- IC1 NE555 General purpose timer IC
- Q1,Q2 BC560 45V 100mA Low noise High gain PNP Transistors
- Q3 ZTX753 100V 2A PNP Transistor
A variable current source is built around Q1 and Q2, this provides linear scale that can be directly mapped to the potentiometer position. Transistor Q3 is employed to amplify the signal to get louder click sound, similar to clockwork metronomes. To obtain more output power and more compact package, a 12V micro battery was used. Don’t worry if you can’t get the battery since it works also for 9V battery. Rotate P1 fully towards R2, then set R1 to obtain 40 beats per minute (compare with another metronome). Rotate P1 fully towards R3, then set R4 to obtain 208 beats per minute.
Finally mark the entire scale with the common metronome steps as following:
40 – 42 – 44 – 46 – 48 – 50 – 52 – 54 – 58 – 60 – 63 – 66 – 69 – 72 – 76 – 80 – 84 – 88 – 92 – 96 – 100 – 104 – 108 – 112 – 116 – 120 – 126 – 132 – 138 – 144 – 152 – 160 – 168 – 176 – 184 – 192 – 200 – 208. [Circuit’s schematic diagram source: redcircuits.com]