Stand Alone 600mA Li-ion Battery Charger
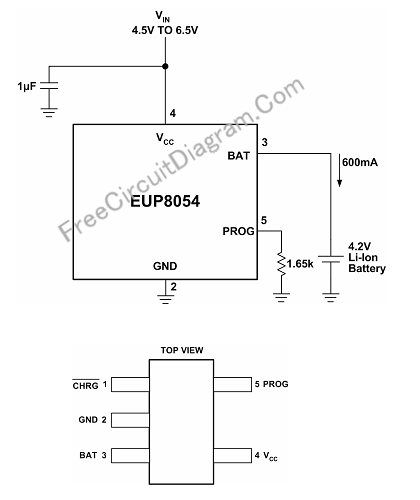
A constant-current/constant-voltage linear charger for single-cell lithium-ion (li-ion) can be constructed using only a tiny battery charger controller chip EUP8054 and a few passive components. This tiny integrated circuit chip is suitable for various portable devices. This controller chip is also compatible with USB power specification, ideal for charging the battery when the device is plugged to USB port. Here is the circuit’s schematic diagram in the minimum system application.
External sense resistor is not needed since the MOSFET internal architecture has accommodated this function. During high power operation or high temperature, a thermal feedback regulates the charge current to limit the die temperature. The charge voltage is fiexd at 4.2V, and the charge current is adjustable via an external resistor. The cotroller chip automatically terminate the cahrging cycle when the charging current drops to 1/10th of nominal programmed value after the final float voltage is reached. The controller automatically enter low current state when the input supply is removed, draw less than 2uA current from the battery.
Normal Charging Cycles
Excerpted from the datasheet:
A charge cycle begins when the voltage at the VCC pin rises above the UVLO threshold level and a 1% program resistor is connected from the PROG pin to ground or when a battery is connected to the charger output. If the BAT pin is less than 2.9V, the charger enters trickle charge mode. In this mode, the EUP8054 supplies approximately 1/10 the programmed charge current to bring the battery voltage up to a safe level for full current charging. (Note: The EUP8054X does not include this trickle charge feature). When the BAT pin voltage rises above 2.9V, the charger enters constant-current mode, where the programmed charge current is supplied to the battery. When the BAT pin approaches the final float voltage (4.2V), the EUP8054 enters constant-voltage mode and the charge current begins to decrease. When the charge current drops to 1/10 of the programmed value, the charge cycle ends.
Programming The Charging Current
To set the charging current (Ic), select the resitor connected to pin 5, R=(1000)/Ic, or Ic=1000/R. Using the component value as shown in the schematic diagram, the charging current is set to 1000/1650=0,606A or about 600mA. Using different resistor value, up to 800mA can be handled by this charger controller.
Charging Status Indication
A charging status can be added by connecting a LED in series with 330R resistor, connected across Vcc and pin 1 of the charger controller chip. The LED will turn on when the charging is active, and off when the charging ends. [Circuit’s schematic diagram source: Eutech Microelectronics EUP8054 datasheet]