SWR Meter For QRP (1 WATT) Level
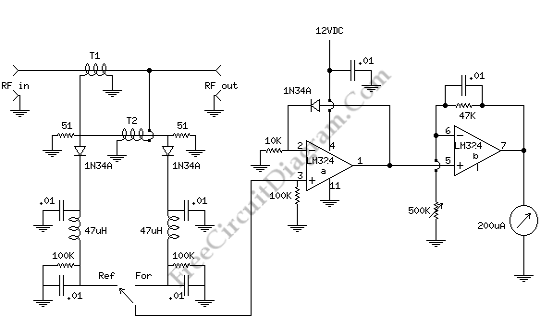
This circuit diagram shows us about simple SWR which is built using readily available parts. Take a note that to ensure accurate power reading, no attempt has been made . If we want a circuit that would fit in a small enclosure, and give an indication of minimum SWR, this circuit does the trick. The trick is based on the ever popular WM-1 made by Oak Hills research, with a few change.
This circuit is built up dead-bug style. A little planning results in a compact and symmetrical layout.( For the section containing L1/L2 symmetry is important).
We have to take a note that T1 and T2 are somewhat unusual. Start with a FT50-61 core. 24 turns of enameled wire is wrapped on it(size not critical as long as it fits). To cover most of the core, spread the turns out. Next take a 1 inch long piece of RG-58/U and strip about 1/8 inch of the jacket off both ends. Remove the braid covering the dielectric on one end, and twist the braid on the other end into a pigtail. Then, slip this prepared cable through the prepared toroid, and connect one end of the enameled winding, as well as the braid to ground. The anode of D1 is connected to the other end of the enameled winding . While the other end goes to the output connector, J2, One side of the center conductor of the coax attaches to the input connector J1.
Then we have to take another FT50-61 and create another assembly as above. One end of this core’s enameled winding is connected to the output computer, while the opposite end goes to ground. One end of this core’s length of coax attaches to the anode of D1, while the other end connects to the anode of D2. Dont forget the pig tail of this core’s coax braid must be grounded. This whole process is easier to do than to describe.
To provide a single turn primary (a wire passing through a toroid acts as a single turn) while the shield grounded at one end only, acts as a Faraday shield which reduces the ‘capacitive’ coupling between windings is the purpose of the length of coax.
LM324 IC is used because it can be had at Radio Shack and runs off a single supply. The values shown in this part of the circuit are for a 200uA meter movement. Adifferent meter may require different value. The rest of the parts can be had from Radio Shack or Dan’s Small Parts.
Connect your TX to J1, a 50 Ohm load to J2, set the switch to ‘forward’ and adjust R for approximately full scale deflection on key down to use it. No deflection or switching to ‘reflected’ should show very little. Check your wiring if not. Although made no attempt to try it on other than 20 and 40, this circuit should work with QRP rigs in the HF bands. [Source: qsl.net]